I created a free Paycheck Planner Template in Google Sheets to help you plan your paycheck smoothly.
Here is what it does and its benefits.
Managing your finances can often feel like an uphill battle, especially when you are trying to balance immediate needs with long-term savings goals.
This spreadsheet is designed to take the guesswork out of your monthly budgeting by providing a clear, structured way to allocate every dollar you earn.
What This Spreadsheet Does
The Paycheck Planner allows you to manage your income on a month-to-month basis.
It utilizes a category-based budgeting system, similar to the popular 50/30/20 rule, to ensure your money is working for you.
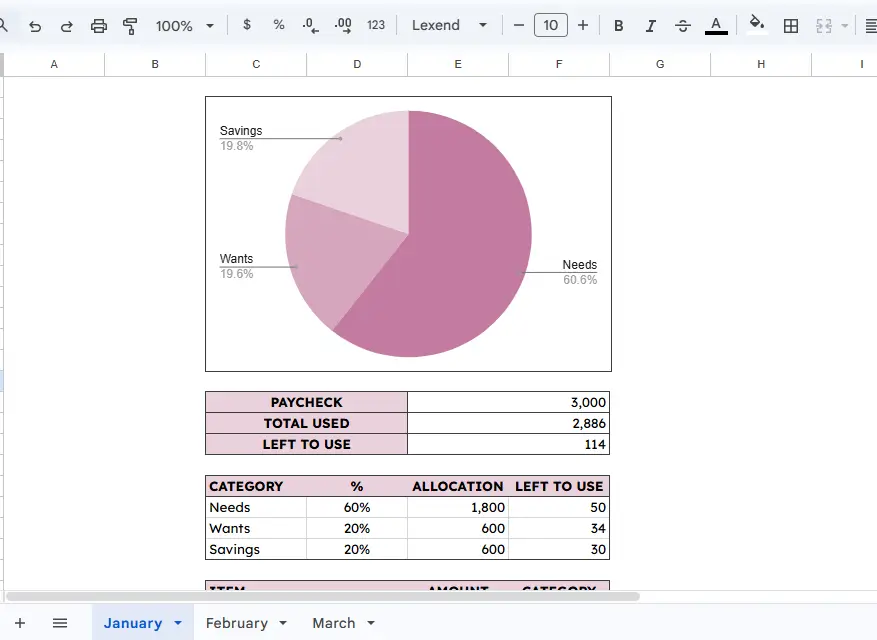
The sheet tracks four primary metrics for each month:
Paycheck Total: Your starting income for the period.
Total Used: The sum of all your planned expenses.
Left to Use: A real-time calculation of how much money remains unallocated.
Category Allocations: A breakdown of your budget into “Needs,” “Wants,” and “Savings”.
For example, in the January template, the user starts with a $3,000 paycheck and allocates 60% to Needs, 20% to Wants, and 20% to Savings.
As you list individual items like “Rent” or “Food and Groceries”, the spreadsheet automatically subtracts these from your category totals, showing you exactly how much is “Left to Use” within that specific bucket.
How to Use the Paycheck Planner
Using the spreadsheet is straightforward and requires only a few minutes of your time whenever you receive a paycheck.
Enter Your Income: Start by typing your total paycheck amount into the “PAYCHECK” cell.
Set Your Percentages: Decide how much of your income should go toward Needs, Wants, and Savings.
The template allows you to adjust these percentages to fit your current financial situation, whether that’s a strict 50/30/20 split or a custom allocation like 60/20/20.
List Your Expenses: In the “ITEM” column, list everything you plan to spend money on.
This includes fixed costs like rent and transport, as well as variable costs like gifts or entertainment.
Assign Categories: For every item, select the corresponding category (Needs, Wants, or Savings).
This ensures your “Savings” like a retirement account or a fund for a “Pixel 8 Pro” are accounted for just as strictly as your “Rent”.
Monitor Your Balance: Keep an eye on the “LEFT TO USE” section. If it hits zero, every dollar has a job. If it’s negative, you know you need to trim your “Wants.”
The Benefits of a Paycheck Planner
The primary benefit of this tool is financial clarity. By seeing your “Needs” vs. “Wants” side-by-side, you can make informed decisions about your lifestyle.
It also encourages goal-oriented saving; instead of just “saving what’s left,” you treat your savings as a non-negotiable expense.
Additionally, it provides stress reduction by eliminating the mid-month panic of wondering if you have enough money left for your bills.
How to Make Your Own Copy
Getting started is easy.
- Open the Paycheck Planner Template via the provided link.
- Go to the “File” menu in the top left corner of Google Sheets.
- Select “Make a copy.”
- Name your new file and save it to your own Google Drive.
Once you have your own copy, you can customize the categories, change the colors, and add new monthly tabs as you go.
This tool is your first step toward total financial control.
Happy planning!